MASTER TAPE SPECS
Tape Format 3/4 inch U-matic Professional NTSC Standard.
Encoding Format Sony 1610/1630 Processor Encoded
Sampling Frequency 44.10 kHz
Time Code An SMPTE, non-drop frame, time code must be recorded on analog channel 2 at 0 VU, + or - 3 db as read on the VTR meter and must be synchronized with the video signal. The time code must be continous, unique, ascending, and must not cross the 24-hour barrier (23:59:59:29 to 00:00:00:00)
It is recommended that the time code be on at 00:00:00:00 at the beginning of the tape.
Lead-In/Lead-Out Periods Tape Lead-In must contain digital silence for a minimum of 30 seconds directly preceding track #1. Tape Lead-Out must contain digital silence for a mimimum of 30 seconds directly following the last track. Continuous time code must be recorded from the beginning of Tape Lead-In through to the end of Tape Lead-Out.
Pause Periods Allow a minimum of 2 minutes of time code to elapse before the beginning of track # 1 to avoid flaws caused by wear/stress at the beginning of tape. This may be done by starting the time code 00:00:00:00 at the beginning of the tape and starting track # 1 at time code 00:02:00:00. It is recommended, but not required, that pause periods between tracks be recorded with digital silence.
Error Status The Master Tape must not contain any mutes, hold errors, average errors, or parity errors from the beginning of Lead-In, through the program material, to the end of the Lead-Out as measured by a Sony DTA-2000 Digital Tape Analyzer.
Pre-Emphasis A Digital Master Tape is acceptable with pre-emphasis, without pre-emphasis, or with mixed pre-emphasis (some tracks recorded with pre-emphasis; some without). Master Tapes with mixed pre-emphasis must contain a minimum pause of two seconds between tracks where the pre-emphasis on/off status changes to allow sufficient time for the pre-emphasis decoding in the CD player to switch on or off.
Cue Sheet A complete Cue Sheet indicating exact (or offset) SMPTE start and stop times of each track must be included with the Master Tape.
Other Formats WINGS will accept Analog, R-DAT, and other Digital Master Tape Formats. However, these formats will need additional premastering onto 1610/1630 3/4 inch U-matic Format.
CD ART PREP GUIDELINES
Printing Areas All artwork must fall into one of the following three areas.
Standard Printing Area
This is the metalized area of the disc but it does not include the mirror
bands. We strongly urge customers to use this area when only printing type
or minimal artwork. This is the most common area printed on a compact disc.
Full Coverage/PixtureDiscTM
This print area covers the entire disc. Well, almost. We cannot print off
of the edge of the disc itself. In a printing term: no bleeds. Likewise,
we cannot print off of the inner edge of the disc (the hole, in other words).
There's also the raised ring near the center of the disc that cannot be
printed over. This stacking ring separates the discs when stacked
during printing and other stages of production. Again in printing terms:
this area gets knocked out. All three of theses areas (beyond the outer
printing limit edge, beyond the inner printing limit edge, and the stacking
ring) must be knocked out on your artwork. If our printing department does
this for you, it will cost you more and production could be delayed.
Up To Stacking Ring Knockout
This area is used for type or artwork which is too large for the Standard
Printing Area but does not need to extend into the center ring area
(the clear, inner area). One thing to remember when using this area: because
the inner mirror band has identification information (words) on it,
printing type or detailed artwork over it causes legibility difficulties.
But if you insist on printing type (especially small type) over this area,
we recommend that you have a base coverage of ink layed down first. White
is a popular choice but, most any color will opaque the problem area.
Artwork
Compact discs are printed using a screen printing process. If you've never prepared artwork for screen printing before, the process may seem a little backwards to you.
[1] We need Film Positives, Emulsion Side Up, and Right-Reading. If you send us something other than this configuration, you will incur an additional charge and it could delay production of your disc.
[2] We need one film positive for each PANTONE(R) color being printed.
[3] If you send us camera-ready artwork, WINGS will produce film positives for an additional charge.
[4] Include a color proof with your order. This can exist as a Colorkey, a Matchprint (for CMYK process jobs only), a dye sublimation print or, a color laser copy. Do not submit a proof from a dot matrix printer.
[5] Most colors will change when printed over another so, it is often necessary for artwork and type to have their under-color knocked out before laying in your trapped artwork or type. Colors will always be accurate when printed over a base-coat of white. Black, however, can overprint without the need for a knockout.
Type
[1] Printing type over the metalized areas of the disc, or over another color, should not go smaller than 6 points.
[2] A serif font, like Times or Garamond, is difficult to print when less than 7 points. A less delicate font like Helvetica or Univers works better at small point sizes.
[3] Any type reversing out of a color should not be less than 6 points.
[4] Type reversing out of the four process colors should not be less than 8 points.
[5] If you are building type out of the four process colors, go no smaller than 10 points.
Halftones & PixtureDiscsTM
[1] Full-Color Process jobs (as in PixtureDiscs) are printed using a 120 lpi screen.
[2] WINGS suggests screening Halftones, Duotones, and tinted colors at 85 lpi.
[3] A white base-coat will be printed first for all Full-Color Process and PixtureDisc jobs, unless otherwise indicated.
[4] A Matchprint proof is required for Duotone or Full-Color Process jobs. If a proof is not submitted with the job, WINGS will produce one at an additional charge.
CD LABEL SPECIFICATIONS
Label Specifications
Positive Film Emulsion Up/Right Reading is required to screen-print Compact Disc Labels. Artwork received in any other form will incur an additional charge.
Camera-ready label art must conform to CD printing area specs.
Full Coverage or PixtureDisc label art or film must have center hole and stacking ring knocked out of film/art.
Depending on type of art, PixtureDiscs should be screened at 65, 85, or 120 lpi. Halftones and screened images should be screened at 85 lpi with a 20% to 80% tonal range.
All ink colors must be clearly stipulated with each label printing shipment otherwise, orders will be delayed until color choices are confirmed. Refer to the Standard Color List or choose custom PANTONE(R) colors.
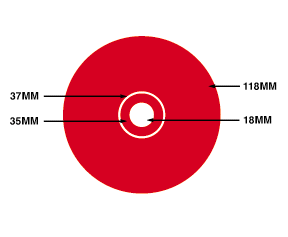
| Areas to Consider | Metric Diameters | Note |
| Size of Compact Disc | 12.0 cm | printing can not bleed off edge |
| Reflective Coating | 3.8 cm to 11.8 cm | includes both mirror bands |
| Outer Printable Area Limit | 11.8 cm | printing can not bleed off |
| Metalized Information Area | 4.6 cm to 11.8 cm | band width of 3.6 cm |
| Disc Identification Mirror Band | 4.1 cm to 4.6 cm | band width of .25 cm |
| Stacking Ring | 3.2 cm to 3.5 cm | knockout width of 4 points |
| Inner Printable Area Limit | 1.8 cm | center knockout diameter |
| Center Hole | 1.5 cm | printing can not bleed off |
CD BOOKLET + TRAYCARD
CD Booklet & Traycard
Keep all pertinent information 2mm from trim lines
Place cut marks close to cut lines.
Extend artwork at least 2mm beyond trim lines for bleeds.
Artwork must be submitted as 150 lpi or 200 lpi Composite Negative Films, Emulsion Down, Right Reading.
Artwork NOT submitted as composite film will incur an additional charge to get the artwork into that form. The customer will be informed of that additional charge after the artwork is evaluated but before the project proceeds.
A Colorkey or Matchprint must accompany composite negatives (not necessary for B/W art).
Final folder thickness can not exceed 1.8mm.
Cut and score lines of the Tray Card must be very accurately marked for ease of eventual insertion.
If Tray Cards are supplied pre-printed, the Spines should be perforated or, at least, deeply scored. This will hep create the desired effect of a crisp corner.
Staples on the booklet must be plce accurately on the fold and cannot protrude above or below that fold. The booklet cannot exceed 2mm on the fold side.
Paper stock is coated on both sides.
Cover print on 60 lb coated cover stock.
Tray cards print on 60 lb coated cover stock (minimum).